Wednesday, September 28, 2016

T-Shirt Design


Hello Friends,

Today I will be highlighting a t-shirt I made using the Art Philosophy and my Cricut Explore.  Take a look below. This shirt was made for my daughter for a project in her Language Arts Class she helped me with the Design.


The shirt was purchased from Hobby Lobby.  I cut the letters @ 3 inches.


A closer look, I used Cricut transfer tape to make sure all of the letters
lined up properly.


This wolf was taken from an image on the internet and then
uploaded to Design Space and using the print then cut feature 
it was sent to my printer.  I hand cut the image out using scissors.


The bottom of the shirt.


And now images of the back of the shirt


I think this came out great for my first t-shirt design.

Thanks for stopping by Cuttin Scraps


Tuesday, July 19, 2016

Baby Card


Hello Friends,

Today I am sharing a card that I made for a friend. She just had a new baby girl and I 
wanted to make a card to go along with the gift .  I designed this card in Cricut Design Space.
I used the Artfully Sent Cartridge and sized it at 7 inches in width to make a 5 x 7 card.
Below I took a screen print take a look.


I also use my Explore to draw the baby carriage on the inside of the card.
I used paper from Close to My Heart for the front of the card and for the inside of the card
I used glitter paper for the front from ColorBok stack I purchased from Walmart
and regular white card stock from Georgia Pacific also purchased from Walmart. 
So this was a simple card.

I hope you like it and get inspired to make something great today.
Thanks for stopping by
Cuttin Scraps


Saturday, July 9, 2016

Cricut July Mystery Box


Hello Friends,

I wanted to share with you today the July Mystery Box.  This is a great box and I am waiting for mine to arrive.  In the box you will receive three cartridges, two roles of vinyl and a cricut mat.  Now this is a mystery so your products may be different from mine.  The cartridges are Sesame Street Cards, Simple Cards Cartridge, and Home for the Holidays Cartridge.  The roles of vinyl are outdoor blue and pink. Also you will get the light blue cutting mat.


July Mystery Box

Great value for three cartridges alone and the Sesame Street Cartridge is not in cricut access so you have to purchase it to cut the images.

I still like to purchase the cricut cartridges,  I know some people rely solely on the digital world but I guess I am old fashion and want it in physical form. Don't get me wrong I like to cut with my Explore as well as my Expression. Sometimes I just don't want to use the computer to design, I just want to put a cartridge in and cut with my Expression.  It is a personal preference I guess.

Thanks for stopping by today

Enjoy crafting

Cuttin Scraps

Tuesday, May 3, 2016

Panama Beach Vacation Page

Hi Friends,

I am sharing this easy page I made using the Family Album Cartridge from cricut.  T was a quick page to put together.  I just cut a few images and stuck it all together.  Take a look.


My completed page I am so glad I purchased this cartridge.  It is a sure way to scrap some needed pictures.  The sun was cut @ 3 inches on page 17.


The I love vacation wording was cut once from page 18 of the book.
I used the negative from the heart as a guide to fuzzy cut another heart of the same size in a 
stripped paper from a 6 x 6 paper pad from the paper studio. 


Here is the negative heart I thought it looked cut so I added it to the top
of this photo mat.


This water boarder was cut from page 17 as well.  I used some of the same 
papers from the paper studio paper pad.


I will be adding pictures from out Panama City Beach vacation from last summer 2015.


I will also be making a few more pages for these pictures that I will share at
a later time.

Thanks for taking a look at my finished page.

Cuttin scraps

Tuesday, April 19, 2016

OH BABY LO

Hello Friends,

Today I wanted to share with you a LO that I made for my son and some of his baby pictures.
Yes he is not a baby anymore but I never scrapped these pictures and thought I would.  Take a look below and let me k now what you think.  I have not added any photos on these photos but I will.


I use paper from CTMH.  I really like how this came together.  It was scrap lifted
from courtney-lane designs.  I changed a few things to make it my own design.


For my banner instead of a solid yellow strip of paper, I decided to 
flip my paper and use the chevron side.


The  frame boarder I used came form the Artistry cartridge and was cut a 3 inches. Found on page 26.
The moon and the OH BABY also cut from the same cartridge and can be found on page
25 of the book.


This little onesie came from my stash from a sticker sheet used on some baby LO done some time ago.  I think it came form Walmart . The stars were cut from a star punch
out of the same yellow paper as the chevron boarder.


The Journal box was just cut using some of the same papers on the LO.
I added some booties from the same embellishments sheet as the onesie came from.


I hope you enjoyed this LO.

Thanks for stopping by 
Cuttin scraps


Tuesday, April 5, 2016

Cake Card


Hi Guys,

Today is the last card of a series of cards that I made from taking an 
online class from mypinkstamper.


This is a super cute card.  She precut the frames for the front of the card
using Deco labels framelits.

The cake and stamp came from the same stamp set called Party Wishes.
and as you can see she also embossed the pink paper with
large polka dots folder.


I used some sparkle on my candles, some stickles that she also
included in the kit. Also I used some candy dots on these cards for some added texture.


Here is the inside of the card. The stamp set came from mypinkstamper set called Everyday sentiments.

I hope you like this card and it had inspired you to check out one of Robyn's classes.
Check out her blog Here

Thanks for stopping by Cuttin scraps

Tuesday, March 29, 2016

Another Birthday Card


Hello Friends,

So as promised here is another one of the cards I made a few weeks ago from 
a class that I took from the Party Wishes Class from mypinkstamper.


This cards was put together really quick. She used a chevron embossing folder for the white mat.
and silver trim.  


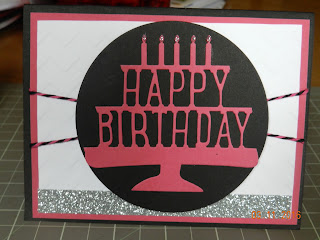
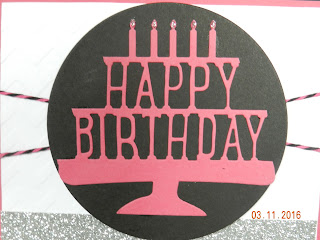
The Happy Birthday was cut out of a party popup thinlit from stampin up.
I just cut around the popup part of this cut and we used the Happy Birthday only.
Also on this card I used some bakers twin to make the chriss cross effect.


Side view of this card as you can see the black circle is popped up on the front.


For the inside of the card I stamped  "a little something for you "
using the Party Wishes stamp set from stampin up.


A  closer look at the from of the card. 
I hope you can see I used some sparkle on the candles.

You can get your supplies from Here by visiting Robyn.

Thanks for stopping by Cuttin Scraps

Tuesday, March 15, 2016

Birthday Cards

Hello Friends,

Today I wanted to share with you a series of cards that I made taking an online class from mypinkstamper.  The name of this class is called Party Wishes there are 6 cards with 3 different designs.  This is the first time that I have taken an online class before and wanted to give it a try.  I have so much Close to my Heart product that I love.  Since I was a consultant for them for about a year.. I just wanted to try the Stampin Up product to compare, so a class was the best way for me to do it.  And I love this class.  It was  very well put together with everything you need to complete the projects.  You will just need some basic adhesive, tape, black ink. Take a look at the first card and tag to go along with it.


These tags were an added bonus in the class.

I use a 1 1/2 inch circle punch to make the circle and the stamp set 
is called party wishes from Stampin up.


The card also used the 1 1/2 inch punch and she used die cuts for the star called star framelits.
and the banner was cut from a punch called triple banner punch.
she also embossed the star with an star embossing folder.


I added some colorful dots to the card called candy dots from stampin up.


A closer look at the front of one of the cards.
I hope you found this post intriguing and want to try one of Robyn's classes .
I will definitely taken another one her classes.  You can check out her blog Here
and order product from her stampin up site.

The other cards will be shared in another post.
Thanks for stopping by
Cuttin Scraps


Tuesday, February 23, 2016

Ahoy Its a Boy Invitation

Hello Friends,

Today I wanted to share with you an invitation I made for a friends brother
's wife baby shower. She is having a boy and wanted the invitations to go with the theme of her baby's nursery. To my knowledge it is themed with sail boats and anchors so hence the card design. Take a look and let me know what you think.


This is a screen shot of Design Space as I designed this card.  I sliced the words Ahoy It's A Boy into the card. The cartridge I used to make is card is Lifes a Beach number M341F6.


Here is a picture of the final cards. I purchased papers from Hobby Lobby.
The anchor paper was used and I was able to get two cards per sheet.  I cut the cards @ 4 x 5.5 inches.


Another look at this card.  The glitter on the top of the cards also came from Hobby Lobby
from the Paper Studio glitter collection.


Here is the inside look of the invitation.  I created and insert on MS Word using the 
graphic text function.  I added an anchor to each invitations which is silver in color to give it 
an added touch.


As you can see I also embossed half of the card to give the from some texture.
I used the Chevron embossing folder form Close to My Heart.


And one last look of my invitation. I made 30 of these and they were really quick to put together
once I had everything cut out.


Thanks for stopping by and sharing your comments with me.

Cuttinscraps

Tuesday, January 26, 2016

What's New Update

Hello Fellow Scrappers,

I had been absent I know. But so much has been going on my son has been inducted into the Boy Scouts highest honor as an Eagle Scout. He obtained the rank of Eagle on November 17, 2015.  See picture below. What a happy days this was for us. We worked really hard over the past two years to obtain this rank.


Next was to find out that my mom had been diagnosed with Stage 11 breast cancer. She is doing really well with her treatments and we are praying for her continued strength and healing. In the name of Jesus. I was able to go to my home town to help her celebrate her 60th birthday. It was a very nice celebration just her children, my husband and grandchildren were at the celebration dinner. See the pictures below.


Finally we had my son Eagle Court of honor on January 23, 2016. It was a wonderful celebration as well so as you can see form all of the pictures. I have been very busy. No so much crafting over the past few months but now that his celebration is over I can find some time to get some pages done in the next week or so. I hope you all enjoyed the pictures has I enjoyed posting then and reflecting on them.


Thanks for stopping by
Cuttinscraps